How to Photograph Highlights for a Scroll-Stopping Feed
Hello, fellow artists. It’s Sophie. Let’s talk about a scenario we all know too well. You’ve just spent four hours meticulously painting a seamless, dimensional balayage. The blend is perfect, the tone is exquisite, and the hair feels incredible. Your client is ecstatic. You grab your phone, snap a few quick pictures under the harsh salon lights, and later that night, you look at the photos. They’re… fine. But they don’t capture the magic. The dimension looks flat, the color looks warmer than it is, and the photo does absolutely nothing to communicate the skill, time, and artistry that went into the service.
If this sounds familiar, you’re not alone. In my years behind the chair and running my own salon, I’ve learned that being a great colorist is only half the battle. The other half is being a great marketer of your own work. Your social media feed isn’t just a collection of pictures; it’s your living, breathing portfolio. It’s the single most powerful tool you have for attracting your dream clients—the ones who see your work, understand its value, and are willing to pay for your expertise.
So, how do we bridge the gap between the masterpiece in your chair and the image on the screen? It’s not about having the most expensive camera; it’s about mastering a few key techniques. Let's break down how to photograph your highlights and balayage work in a way that stops the scroll and fills your books.
It Starts Before the Camera: Prepping the Perfect Canvas
You can have the best lighting in the world, but if the hair isn’t styled to perfection, the photo will fall flat. The final finish is what showcases the color placement, the blend, and the health of the hair. This is a non-negotiable first step.
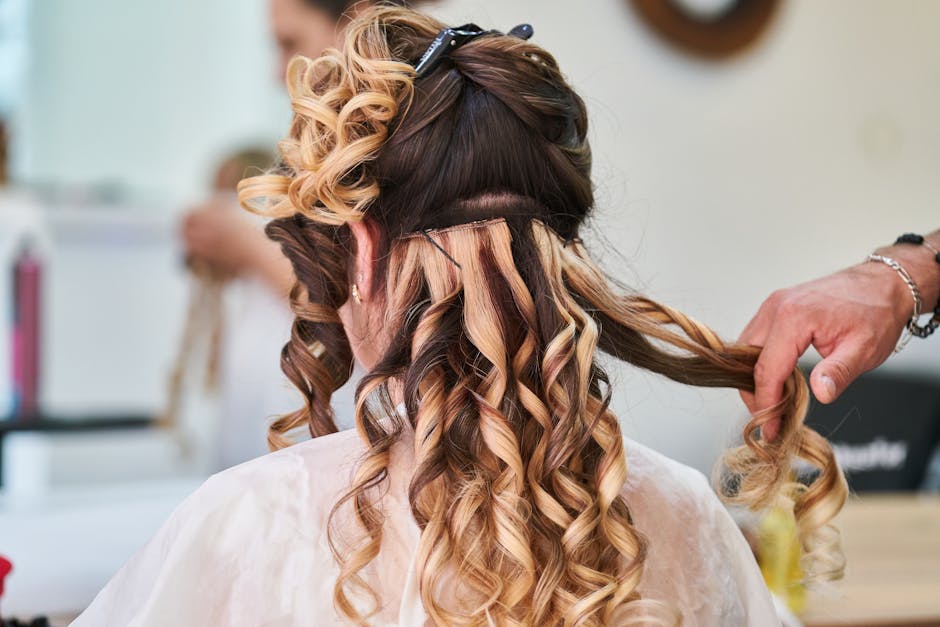
- The Flawless Finish: Whether you opt for a bouncy blowout or my personal favorite for highlights, a loose, modern wave, the execution needs to be impeccable. For waves, I always use a 1.25-inch wand or iron, leaving the last inch or so of the ends straight for that effortless, lived-in look. The key is to create movement that will catch the light and show off the ribbons of color.
- Product is Paramount: Your product choice can make or break your photo. You need something that adds shine and separation without weighing the hair down or making it look greasy. I swear by a lightweight shine spray, like Kevin Murphy’s Shimmer.Shine, misted from a distance. For definition in the waves, I’ll use a touch of texture spray on the mid-lengths and ends, but never at the root where it can dull the color.
- The Gentle Comb-Out: After creating your waves and letting them cool completely, don't just run your fingers through them. Take a wide-tooth comb and gently brush through the curls once or twice. This technique separates the waves into beautiful, fluid sections that reveal the intricate details of your color work without creating frizz.
Remember, the goal of the styling is to support the color. We’re selling the dimension, the blend, and the healthy shine—the style is simply the vehicle to show it off.
The Holy Trinity: Lighting, Background, and Angles
Once the hair is perfect, it’s time to create the perfect environment for your shot. These three elements work together to create a professional, high-quality image that screams "expert."
Lighting is Everything
This is the most critical element. Bad lighting can kill even the most beautiful color job. Your goal is bright, diffused light that illuminates the hair without creating harsh shadows or blowing out the highlights.
- Natural Light: Your absolute best friend. Find the largest window in your salon and position your client facing it. The soft, indirect daylight will make your colors look true-to-tone and bring out every nuance. Avoid direct, harsh sunlight, which will wash everything out.
- The Ring Light: A salon staple for a reason. An 18-inch ring light is a fantastic investment. However, don’t just place it directly in front of your client. This can sometimes flatten the dimension. I like to position it slightly to the side and above, which creates a bit more shadow and depth, making the highlights pop. Make sure your light is set to a clean, white temperature to avoid casting a yellow hue.
A Clean, Uncluttered Background
What’s behind your client is just as important as what’s on their head. A messy, distracting background cheapens your work and your brand.
- Keep it Simple: A plain wall in a neutral color (light gray, white, even a clean brick texture) is your best bet. It ensures the focus remains entirely on the hair.
- Create a Designated "Photo Spot": If your station is always busy, find or create one specific corner of your salon just for photos. Keep it clean and ready to go. This consistency will also give your social media feed a cohesive, professional look.
Work Your Angles
The standard "back of the head" shot is fine, but it’s just one piece of the puzzle. To truly showcase your work, you need to capture it from multiple perspectives.
- The 45-Degree Turn: This is my go-to. Have the client turn slightly away from the camera. It shows the flow from the face-framing pieces to the length in the back.
- The Movement Shot: Ask your client to gently shake their head or run their fingers through their hair. Use your phone’s burst mode to capture a series of shots. This creates a dynamic, authentic image that shows how the color moves.
- The Detail Shot: Get close! Capture a macro shot of the money piece, the seamless root blend, or the transition from dark to light. This highlights your technical skill.
Directing and Editing for a Professional Finish
Your client isn’t a professional model, and that’s okay! It’s your job to guide them to get the best possible shot. Be confident and give clear, simple instructions like, "Now just look down toward your shoulder," or "Gently sweep your hair to one side." Most clients are happy to help, especially when you’ve just made them feel beautiful.

And always, always take a "before" photo. Take it in the exact same spot, with the same lighting you plan to use for the "after." A dramatic, well-executed before-and-after is one of the most powerful sales tools you have.
Editing: Enhance, Don't Deceive
Your editing should be the final polish, not a total transformation. The goal is to make the photo look as good as the hair does in real life. I use the Lightroom Mobile app for almost all my edits.
- Key Adjustments: Focus on increasing the Brightness slightly to make the details visible, adding a touch of Contrast to make the colors pop, and sharpening the image with the Clarity or Texture slider (use this sparingly!).
- Fix the White Balance: If your photo has a yellow or blue cast from your salon lighting, use the color temperature tool to neutralize it and make the whites look crisp and clean.
- Create a Preset: Once you find a combination of edits you like, save it as a preset. Using the same preset on all your photos will give your feed that polished, cohesive aesthetic that attracts high-end clients.
A stunning photo is your hook, but you need a clear call to action. In your caption, briefly describe the service and always tell potential clients how to book an appointment. An integrated booking system is crucial here. Personally, I use REZVA to manage my schedule and client bookings because it allows new clients to reserve their spot directly from my social media profile. It streamlines the entire process, turning a follower's admiration into a tangible appointment in my book. You can explore how it works for professionals on the REZVA specialists page.
Your Feed is Your Future
Treating every finished client as a potential portfolio piece will fundamentally change your business. It’s not just about vanity; it’s about strategic marketing. High-quality photos justify your pricing, attract your ideal clientele, and build a brand that stands out in a crowded market.
It takes practice, but by focusing on a flawless finish, mastering your lighting and angles, and applying a light touch in editing, you’ll create a portfolio that truly reflects the artist you are. Now go create—and capture—something beautiful.
Frequently Asked Questions
What's better for hair photos, a smartphone or a DSLR camera?
Honestly, the camera in today’s high-end smartphones (like the iPhone Pro or Google Pixel) is more than powerful enough for social media. Their built-in portrait modes are fantastic for creating that soft, blurry background that makes the hair stand out. A DSLR offers more manual control but comes with a much steeper learning curve and cost. My advice? Master the camera you already have in your pocket before investing in anything else.
How do I get clients to agree to be photographed?
Ask them at the beginning of the consultation! Frame it as a compliment: "I have a vision for your color that I think is going to be stunning. If you're comfortable with it, I would absolutely love to feature the result on my professional portfolio." Most clients are flattered. Always offer the option to not show their face. For your own protection and professionalism, having clients sign a simple, one-sentence photo release form on their intake waiver is also a great business practice.
My salon has terrible, yellow-toned lighting. What’s the best budget-friendly fix?
This is a super common problem. The most effective, budget-friendly solution is a single, good-quality 18-inch ring light. It provides bright, even light and you can adjust the color temperature to a clean, daylight white. Find the best wall in your salon to use as a backdrop, set up your ring light, and you have an instant photo studio. If you have any access to a window, even a small one, prioritize that natural light over anything else.
Take hair bookings online, free.
REZVA helps specialists manage bookings, cut no-shows, and grow their business. Free to start, no booking fees.